
Migrating from Drupal to Jekyll
What’s this blog post about?
The content of this blog has been migrated from one platform to another several times now. Back in the day I had an account on Blogger. It looks like it’s still there, which probably isn’t doing wonders for the SEO on this site with the copied content.
After that I started making blog posts on Software Reference, my publishing company’s site. The posts were technical things that interested me, but weren’t necessarily relevant to the topics of the books we published (i.e. they tended to be about programming rather than netiquette or Microsoft Word 2007).
Next the content moved to its own domain: matthewstrawbridge.com. Until now it’s been a Drupal site. This post is about migrating that content from a dynamic Drupal site to a static one generated using Jekyll… why I wanted to change and how I did it.
What’s wrong with Drupal?
First things first, what is Drupal
Drupal is a content management system along the same lines as Joomla and WordPress.
I started using Drupal because it seemed to be the most powerful of these options: it gives you low-level control of your site without tying you into a particular way of doing things, and there is a good selection of plug-ins for further extending it.
There’s nothing inherently wrong with Drupal. It does what it sets out to do. Once you’ve got a site set up you can post new content and it takes care of the rest. If you’ve got some hosting space you can get it set up and configured fairly easily.
What’s the catch?
However, the elephant in the room is the way it handles updates.
How I would like Drupal to handle updates:
- You log in as the administrator and click a button labelled Update.
How you actually handle updates:
- Take the site offline.
- Manually download the latest version.
- Remind yourself how to install it.
- Go through a painful patching process.
- Put the site back online again.
That’s the abridged version. See the
UPGRADE.txt file if you’ve
got time to burn.
All of which means that, unless you spend your life administering Drupal websites professionally, your site is probably going to lag behind the latest version for a while until you can summon up the energy to go through the pain of updating it. I’d go as far as to guess that most Drupal websites are not up to date most of the time.
Even with resources such as Drush and Bernhard Fürst’s version patches, the whole process is orders of magnitude more painful than I’d like it to be.
The final nail in the coffin
So what is the tipping point? What has finally nudged me to abandon Drupal for good?
It’s this security advisory (which I somehow missed at the time) and its follow-up (which I almost missed too).
Basically, if you were using Drupal and hadn’t updated the software then your site was wide open to hackers and there was a good chance that it had already been compromised by a wide-scale automated attack. Why constantly fight to keep installing security patch on security patch when you can just serve it all up as static content?
What’s good about Jekyll?
So what is Jekyll?
![]()
Jekyll essentially knows about markdown and blogs, and how to turn one into the other. It’s the engine that powers Github Pages, so it’s got a good pedigree.
Once it’s installed, you can just start writing posts as markdown files. You
can set Jekyll’s local server running and watching for changes and view the
blog in a web browser pointed at localhost (http://localhost:4000 by
default).
From there it’s just a matter of copying the static content to your server. I’m using site44 so deployment is as simple as copying it from one Dropbox folder to another and waiting for it to sync.
What else did I consider?
Octopress
Octopress (http://octopress.org/) is built on top of Jekyll, so one is worthy of consideration if you’re thinking of using the other. In theory Octopress simplifies working with Jekyll by providing various templates and helper scripts. However, after reading various posts online from people switching from Octopress back to plain Jekyll – for less complexity and more control – I decided to plump for Jeckyll on its own.
If you’ve written HTML and CSS in the past then editing the HTML templates and sass/scss styles used by Jekyll is actually quite pleasant, so I’m not sure Octopress would add much apart from complexity.
SquareSpace
SquareSpace would take away all the pain of administering you own server by providing that for you. I’ve used it before for various projects.
It is a fine option if you don’t already have hosting space that you’re paying for. If you do, then it’s just a little too expensive, especially if you don’t need more than one user to be able to post updates.
They’d do well to have an inexpensive cut-down option with very low storage and bandwidth to encourage people into their ecosystem.
Getting up and running with Jekyll on Windows
Jekyll’s really easy to use on Linux or a Mac. On Windows it’s a bit more fiddly to set up: some combinations of the various components work better than others. There are basically two ways to go: follow the excellent instructions here or download the whole lot pre-configured from PortableJekyll. I went the latter route.
Go to https://github.com/madhur/PortableJekyll and fork it.
Open Github for Windows and click +, Clone, Portable Jekyll, Tick.
Select a folder to clone it into. I chose the folder Software in my Dropbox. t takes quite a while to fetch the content, so go off and do something else while you’re waiting. You end up with a PortableJekyll folder beneath the folder you selected. (You could just download the latest snapshot from GitHub and unpack it onto disk without the repository, but doing it via Git should make updating to future versions slightly easier.)
Creating a blog
Creating an empty Jekyll project
In a console, change to the parent folder of where you want to create your site.
Run the setpath.cmd file from the folder you saved Portable Jekyll into:
c:\Users\Matthew\Dropbox\Software\PortableJekyll\setpath.cmd
This adds the components of Portable Jekyll to the path.
Now use the jekyll new command to construct an empty Jekyll project:
c:\Users\Matthew\Dropbox\Web>jekyll new MatthewStrawbridge.com
New jekyll site installed in c:/Users/Matthew/Dropbox/Web/MatthewStrawbridge.com.
This creates various files and folders to form a very simple website.
Now is a good opportunity to add the empty site as a baseline to Git:
cd MatthewStrawbridge.com

git init

git add .

git commit -m "baseline"
Setting up syntax highlighting
Jekyll ships with a couple of syntax highlighters:
-
Pygments is the default. It’s written in Python and supports syntax highlighting in lots of languages.
-
Rouge is written in Ruby and supports fewer languages, but still has all the ones I’m likely to need.
I had issues getting Pygments to run so I added the following to my site’s
_config.yml file to switch it to use Rouge:
highlighter: rouge
Building and viewing the site
Now we can try building the new empty site.
jekyll build
If you don’t get any red text output to the console then it has probably worked.
So we can now try the site:
jekyll serve --force-polling
(You might need to allow the Windows firewall to let Ruby do its thing, if you get asked.)
It looks like you need to use the --force_polling option on Windows. Without
this, once watch was triggered by a change, it tried to regenerate the whole
site once per second even when there were no further changes! But with this
option it sits there quite happily, only springing into action when a genuine
change has been made.
This starts a local webserver and watches your project for changes. To see the
site, just go to http://localhost:4000/ in a web browser.
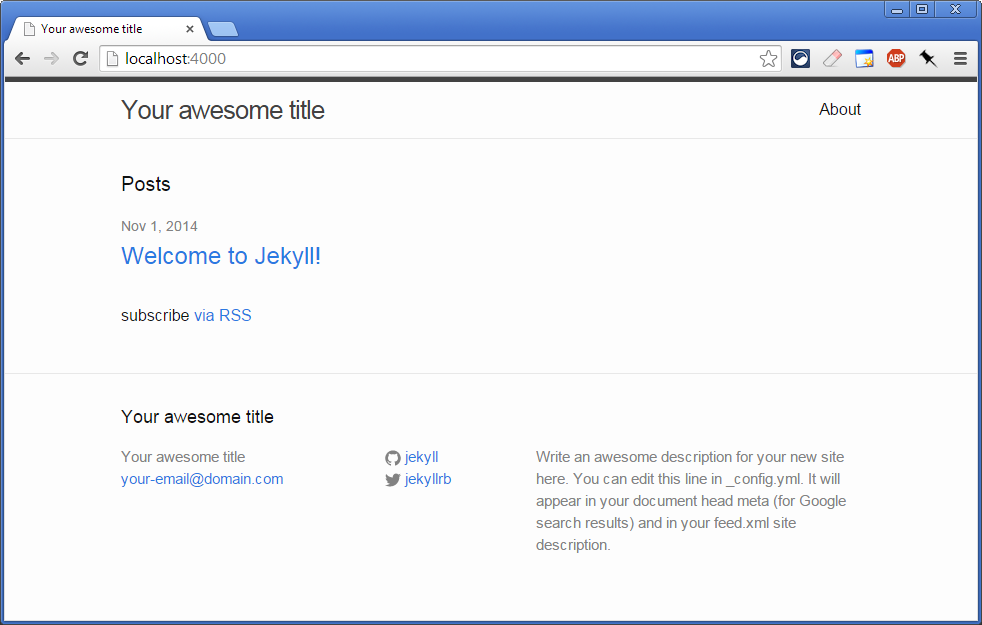
You should see something like this:
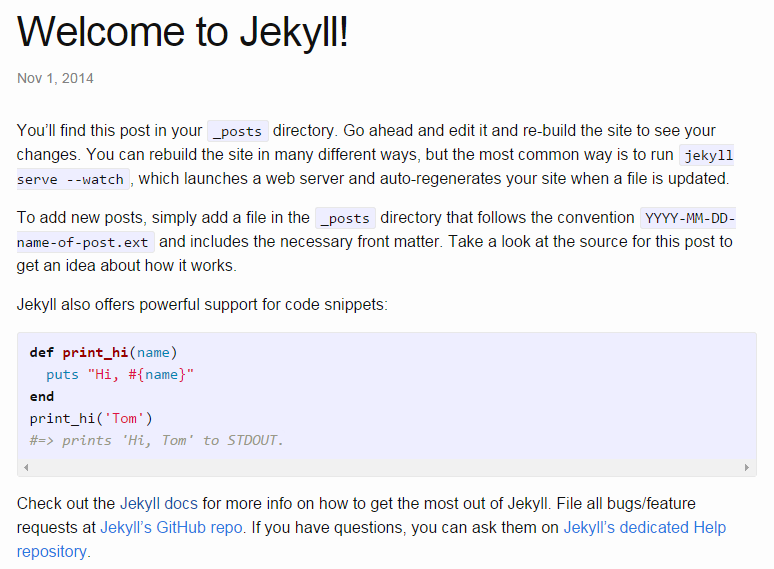
Clicking on the title of the default post which has been created for you gives you an idea of the format you can expect, as well as providing some basic instructions about what lives where:
This is a good point to tweak the various settings in _config.xml to make
the site feel more your own. The server will continue to run in the background
so once you save the file, give it a second or two and you can reload it in
your browser.
You might need to kill the Jekyll server and restart it to detect that the config file has changed.
Adding posts
Adding a new post is as simple as creating a new markdown (or HTML if you
prefer) file in the _posts directory. If you use the default naming
convention of yyyy-mm-dd-title then you don’t have to specify the post’s
date and title in the metadata section at the top of the file.
As an example, the top of the markdown file for this post looks like this:
---

layout:     post

title:      "Migrating from Drupal to Jekyll"

date:       2014-11-08 23:30:00

published:  true

---


# What's this blog post about?


The content of this blog has been migrated from one platform to
another several times now. Back in the day I had an account on
[Blogger](http://philoxenic.blogspot.co.uk/). It looks like it's still there,
which probably isn't doing wonders for the SEO on this site with the copied
content.
You can read more about Markdown formatting here.
Summing up
So that’s it. I’ve moved from a fairly heavyweight content management system to lightweight HTML. It’s just as easy to write posts in Markdown as it was to use Drupal’s editing system, and publishing new posts is simply a matter of running a script to copy the generated site from one part of my Dropbox hierarchy to another.
If you’re looking for a way to publish a blog or other content as HTML but prefer writing in Markdown then give Jekyll a try.